Please note: The products offered here are available for the special prices listed on this site only. They are not available at retailers at these prices.
Dremel is a division of Robert Bosch Tool Corporation. To learn more about Dremel, visit our main Web site, click here.
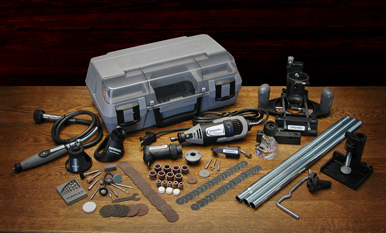
Here are some Frequently Asked Questions about the MULTIPRO TOOL:
Q: What is the warranty period on my Dremel Corded MultiPro Rotary Tool?
A: Five years.
Q: Is high speed best for most applications?
A: Most of our accessories are designed to work well at highest speeds of 35,000 RPM. Some will be more effective slightly slower. Some will be more comfortable at a somewhat slower rate. Selecting the best speed will depend on the material you have (plastic will melt if you go too fast), the accessory you are working with and the task you are accomplishing. To illustrate this, if you tried to use a cut-off wheel in the end of a standard drill to remove the head of a screw, the task is quite laborious. With the high-speed rotary tool, it's short work because of the high speed.
Q: Can the MultiPro be reversed?
A: Reversal isn't possible. Our accessories that are fluted, like high-speed cutters, are also designed to move in one direction, so reversing them would make them less effective.
Q: How often should I change my motor brushes?
A: Check the motor brushes every 50-60 hours of use. When they are 1/4" in length, brushes are considered worn and should be changed.
Q: What are collets?
A: There are four different sized collets available for the rotary tool. A collet is a slim aluminum tube with small slits in the sides and the outer end is slightly larger than the shank that can be used with each collet. When the chuck cap is threaded onto the end of the tool, over the collet, the fingers of the collet (slots) close around the shank of the accessory and hold it into place.
Q: What is the shank?
A: The shank is the portion of the accessory that is actually inserted and held in the rotary tool.
Here are some Frequently Asked Questions about the FLEX-SHAFT:
Q: How do I attach the Flex-Shaft to the rotary tool?
A: It is necessary to remove three items from the nose of the rotary tool:
1. The housing cap. (You'd hardly know it's there until you twist the end of the housing.)
2. The collet nut. (It's a small nut on the end of the tool.) Hold down the collet lock button and remove the collet nut.
3. The collet. (This is a small piece with slotting in it that act as fingers to hold the accessory in place; the collet rests in the end of the tool under the collet nut.)
You should have three pieces in front of you from the end of the rotary tool. In the packaging with the Flex-Shaft, there is a driver cap with a small square hole in it. (It's easier to see the square hole if you hold the nut up to the light.) Again, holding the collet lock down, carefully thread the driver cap (nut with square hole) onto the bare metal threads of the rotary tool where the collet and collet nut were removed. To make the Flex-Shaft functional, the collet needs to be placed in the end of the handpiece on the flexible shaft, the collet nut threads onto the end of the handpiece. To be able to tighten the collet nut onto the end of the handpiece, it is necessary to place an accessory into the hole on the side of the handpiece. This will stop the threaded area from turning as you tighten the accessory you want to use in the handpiece.
Q: What would you use the Flex-Shaft for?
A: The Flex-Shaft Attachment is ideal for getting into tighter areas, providing more control for the user and taking the weight of the rotary tool away from the user's hand. If you were doing fine engraving, this could provide that extra control and lessen the fatigue one could normally feel if the project was a little bigger. If you were doing work on an engine, where things can get pretty tight, the Flex-Shaft might be just what you need to get in there.
Q: Why don't you include the chuck cap and collet with the Flex-Shaft?
A: We include the driver cap. Remember, the driver cap is the nut with the square hole. You can see the square hole when you hold the nut up to the light and look through the opening. You need the driver cap to "drive" the cable of the Flex-Shaft. If you have a rotary tool, you already have a chuck cap and collet. It comes on the end of the rotary tool. To make the Flex-Shaft work, you need to remove the housing cap (the threaded part of the nylon housing), the collet nut and then the collet from the rotating end of the rotary tool. Put the housing cap in your toolbox so you don't lose it. The chuck cap and collet will be put to use on the end of the handpiece. The driver cap (nut with a square hole) goes on the end of the rotary tool where you removed the chuck cap, collet and housing cap.
Q: Will the Right Angle Attachment work on the Flex-Shaft?
A: No, it will not.
Here are some Frequently Asked Questions about the CUTTING GUIDE ATTACHMENT:
Q: Why do I need a Cutting Guide?
A: The accessories used in conjunction with this guide are very aggressive. The accessories will grab into the subject material and pull the tool into the material as well. To maintain depth and stop the tool from ripping into the material, the guide is necessary.
Q: How does the Cutting Guide attach to the tool?
A: It attaches very easily. There is a small cap on the spinning end of the tool. It is the same material as the housing. It's called a housing cap. By unthreading and removing the housing cap, the Cutting Guide will thread right onto the rotary tool.
Q: What is the best direction to cut using the Cutting Guide, clockwise or counterclockwise?
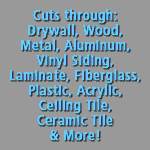
A: Always move in a clockwise direction when cutting with any spiral saw, unless you are cutting in drywall. When cutting in drywall, you will get a cleaner cut and have more control if you cut counterclockwise. (That has nothing to do with the spiral saw and is based on the unique make-up of drywall.)
Here are two Frequently Asked Questions about the ROUTER ATTACHMENT:
Q: What kinds of wood can I rout?
A: You will be able to rout in many kinds of wood. Some woods will be characteristically more difficult to rout. So keep the following in mind: the router bits are constructed of high-speed steel, not carbide. Thus, they will wear out, and they can burn if you try to force them to take too much material too fast. The high speed of the tool heats the accessory bit up very rapidly. Excess debris, which can also be quite warm, will add to the heat. Softer woods tend to be a little more sappy, so that sap can add to the heat. Hard woods are simply more dense and may require a second, less aggressive pass with the bit to get a great cut.
Q: What is the maximum depth that can be routed?
A: This will depend on the wood you're routing. If you're routing a harder wood like oak, and your depth requirement exceeds 1/4", you will find greater success by making a second pass through the same channel routed. If you're working in a softer wood like pine, depths of up to 3/8" should be possible without difficulty.
• Contact Us